Thursday, February 20, 2014

Sewing with Preschoolers and Kindergarteners; Circus Quilt for Project Linus

It has been a little busy here, sewing quilts with each of my kids' classes.  First, I did one with the first graders in my son's class.  Now, we have finished one with the 3-6 year old class at my daughter's school.  I started working in her class before the other one was completed, so overlapped these projects a bit.  I like having them done close together, but it was a lot of time spent sewing and things like making dinner were put on hold for a little while.  Hey, if we order a pizza, I can keep on sewing.

Last year, I did a very similar project with this class (both my kids were in the same classroom last year).  It was my first time doing a project like this, and it went well, but it took much longer than I had planned.  This year, I chose a circus theme because in addition to being cute, the designs stitched out much faster.  However, even though the colors the kids used are bright and colorful, just having them be the outlines makes the designs a little less vibrant than last year's quilt.  I have an idea for next year that I think will have the bright colors of last while stitching out much more quickly.  If I keep doing this, eventually I will perfect the method.

I was impressed with how many kids remembered  making a quilt last year.  Many of them remembered what to do and one little girl asked if I was going to give this one to a kid in the hospital too.  It's sometimes hard to tell how much they "get" it, but most of them seem to remember at least a little bit. 

Here is the finished quilt with some of the kids who helped to make it.


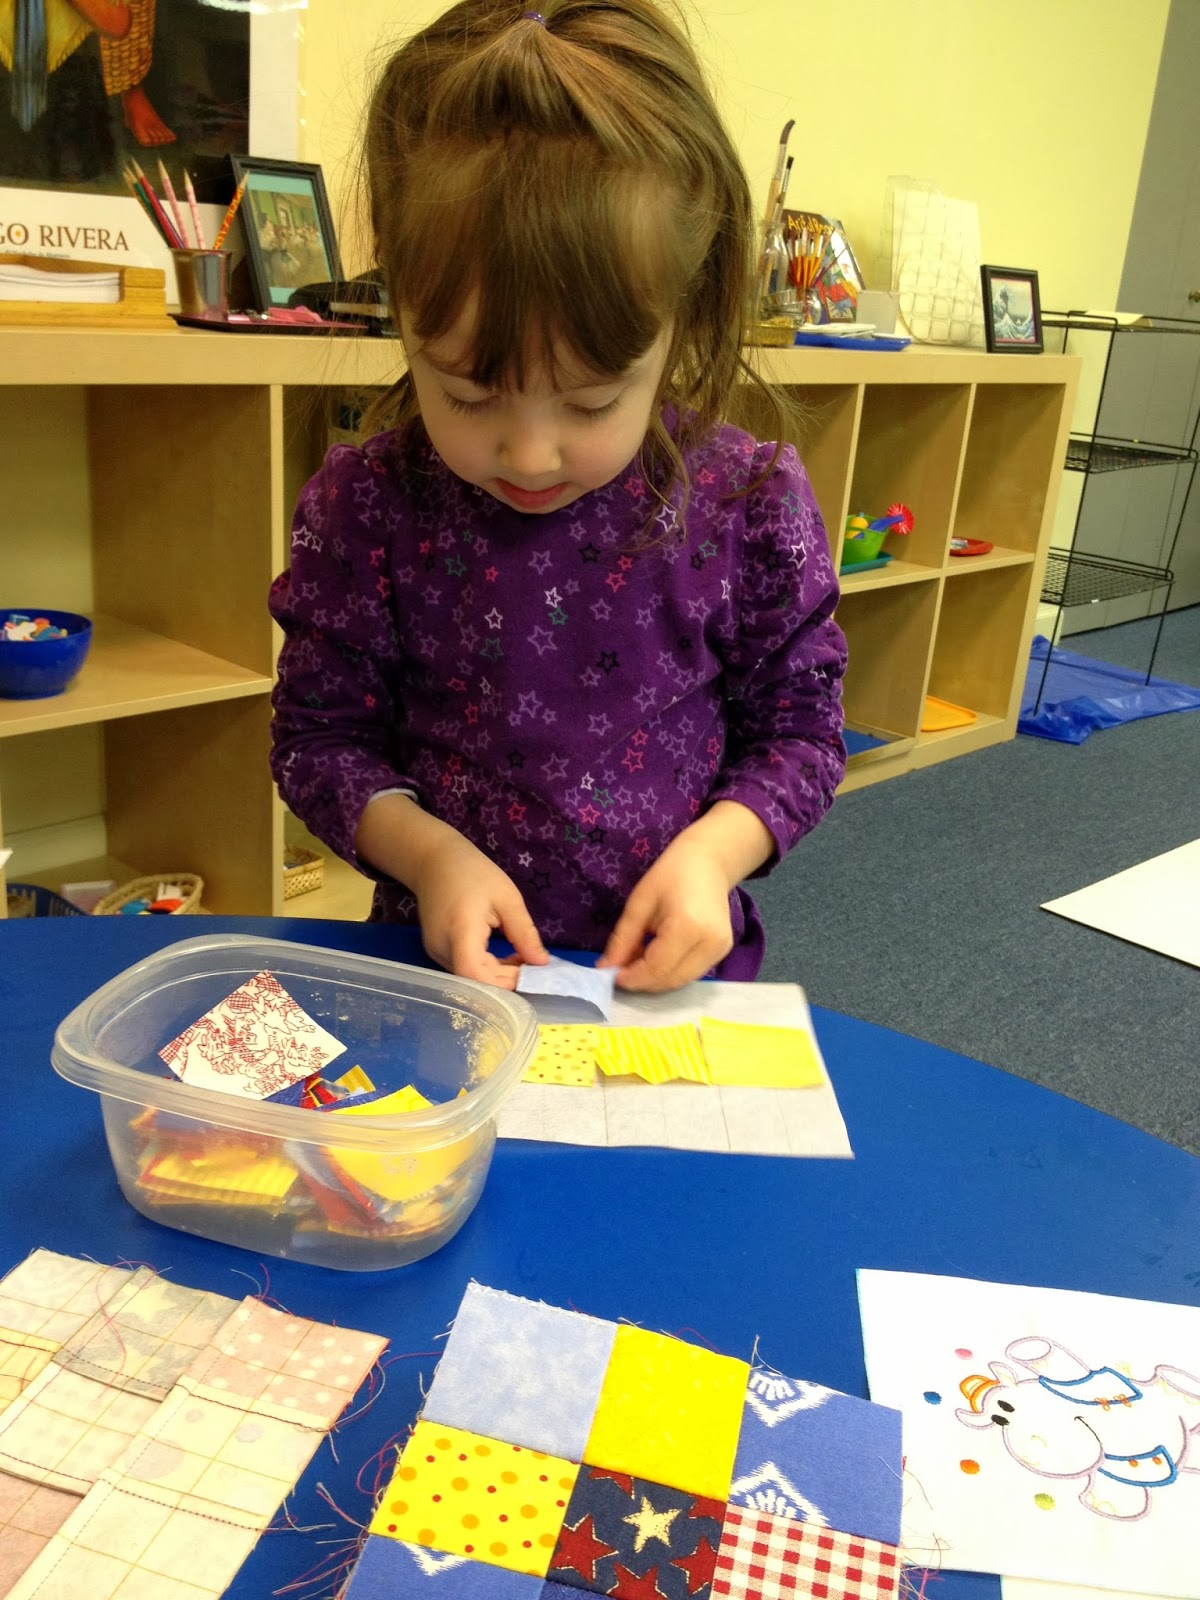
Last year, the children only made the embroidered squares.  This year, I used the same grid interfacing as with the first grade class, and had them also make a nine patch square.  The kids were very cute choosing just the right fabrics to make their designs; they were very particular and few started over if I did not have enough a certain fabric that they wanted.

They picked out their fabric and placed it on fusible interfacing that has grid lines.  I took them home and ironed them onto the interfacing, then sewed the squares together.


 Look at her concentration.  Getting the fabric placed exactly in the squares is much more difficult than you would think.

 Sometimes, they get a little extra help from friends, whether they want it or not. 


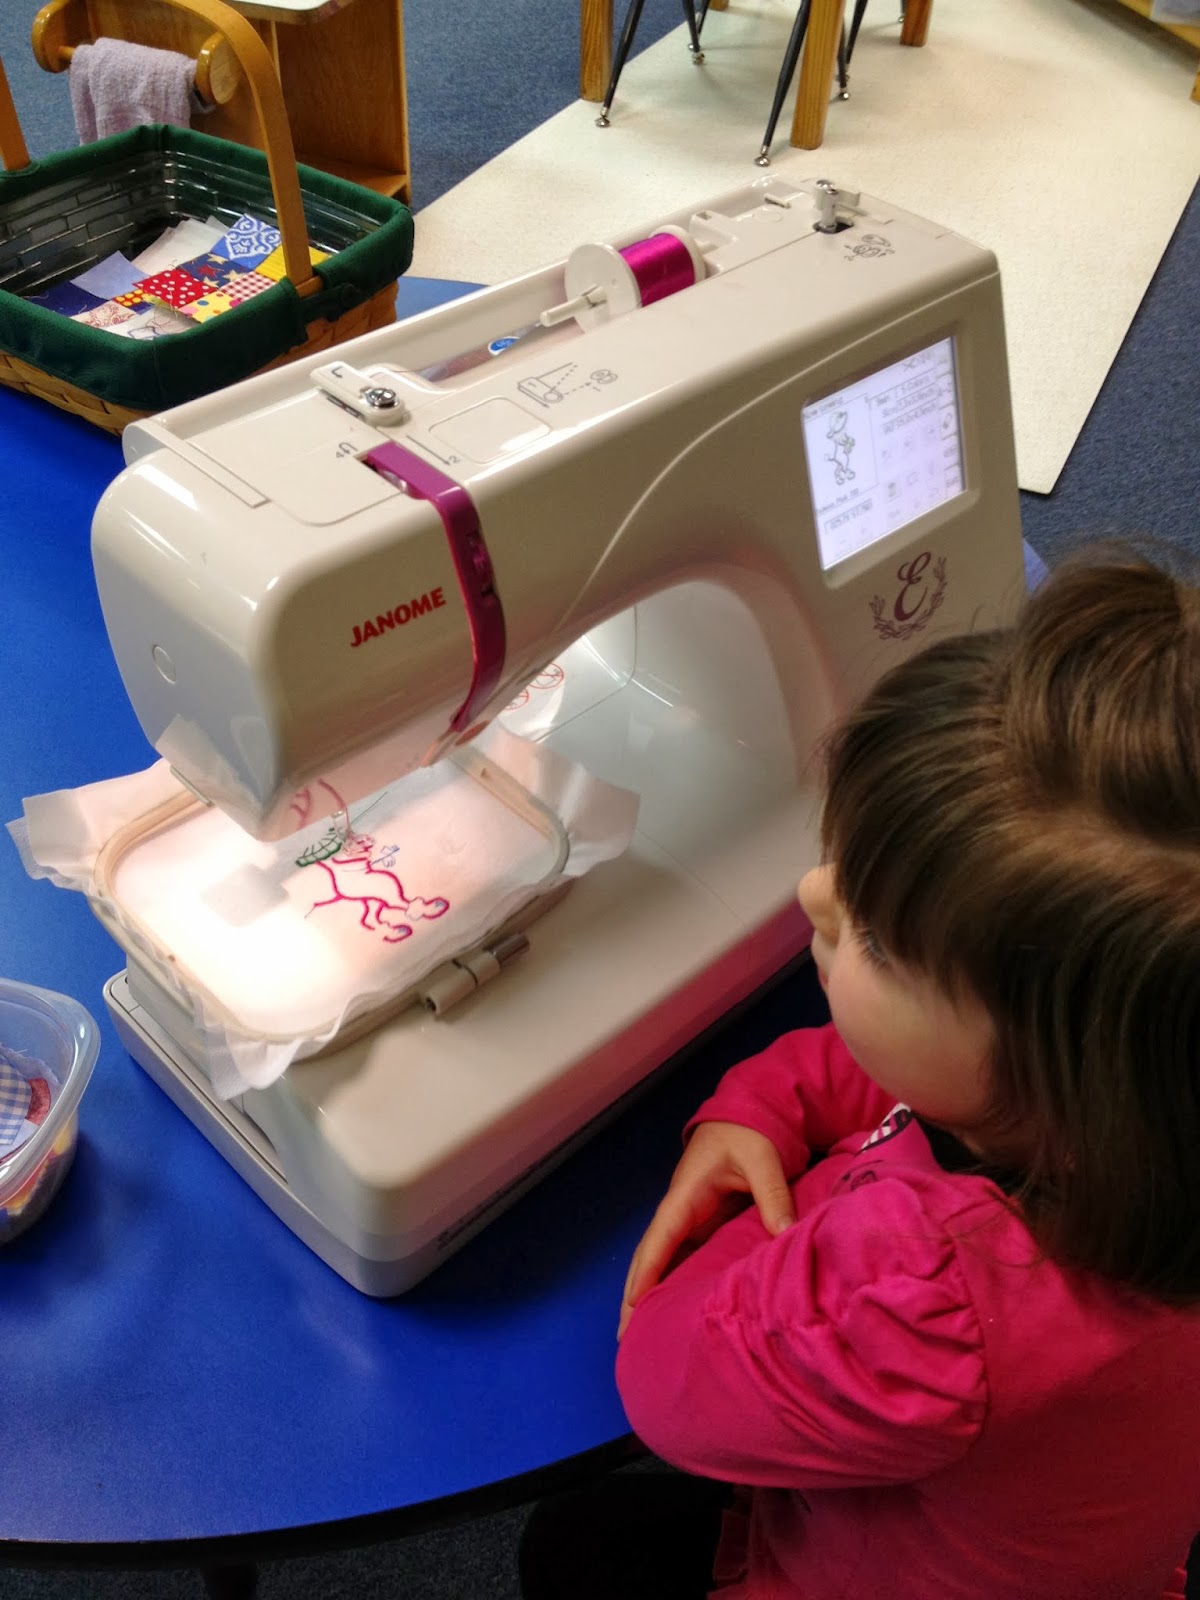
The most exciting part for the kids is getting to use the embroidery machine!  I show them how to thread it, then they try it themselves when we change colors.  Only two kids did not attempt to thread the machine, and they are the youngest.  The ones who are around 4 years old, can do at least a few of the steps, and most of the kindergarteners threaded it with no help from me at all.

First, they pick out their design, and find the picture of it on the touch screen.


Next, they pull the old thread off and put the new color on.


Sometimes, it was hard to see up that high.


Then they follow the numbers and arrows on the machine to thread it (it threads like a regular sewing machine).  The five and six year olds were surprisingly good at this.


 Once it is threaded, they lower the presser foot, by flipping the lever at the back down.


Then they push the big "start" button.


The embroidery machine does almost all the work and it is fun to watch it do its thing.


 Once their designs were done, we took them off the machine to see how they came out. All the kids were really proud of their work.
 I love that she chose to make a horse and is wearing a horse skirt and sweater.


Here all all of the embroidered squares!  It takes a while for everyone to get a turn, but it went faster than last year.  We managed to get about five done each day I came in to class.


When I brought the quilt in to show the kids, the kindergarteners were out of the room, having drama practice.  Here are all the preschoolers, who were there that day, with the quilt.


Once the kindergarteners came back, I showed them the quilt too and we did another picture, but the half day preschoolers had already left.  As you can see, they are on their way to lunch.

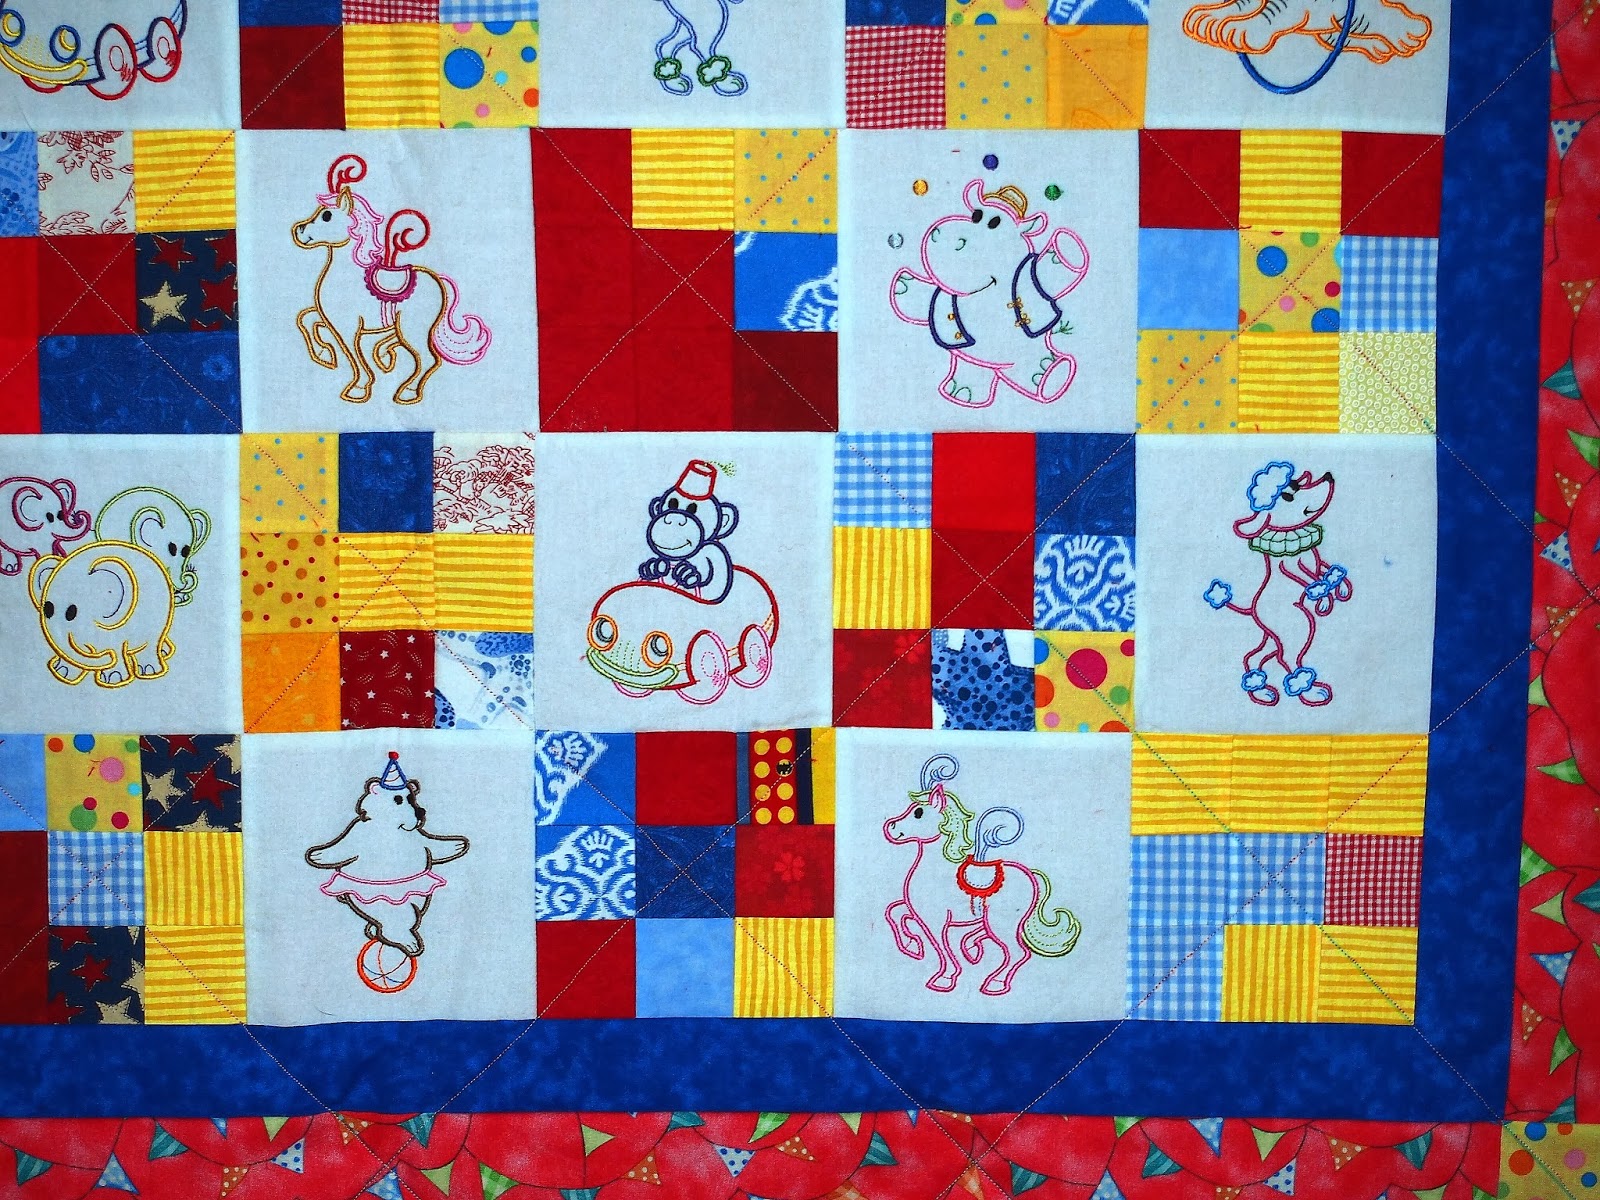
 Here is a bit of a close-up of the finished quilt.  For the quilting, I kept it really simple and just ran a straight line from corner to corner on the patchwork squares.

On the back, the quilting stands out a bit.  The backing is a bright red ultra cuddle fabric that is super soft and snuggle-y.  My four year old was with me when I bought the fabric and she immediately stole it and snuggled it in the cart.
 I love the subtle striping on the binding.
  

I love how all the crazy colors the kids chose go together to make such a happy quilt.  I also love the randomness of the nine patch blocks.  Here are some close-ups of the quilt to show them off.


 This was such a fun project to do with the children and the outcome is amazing.  I'm always amazed at what they come up with and how beautiful the finished product is.  Here is hoping that the lucky child who gets this quilt loves it.  I will be taking it to Project Linus very soon.

Friday, January 24, 2014

Quilting with First Graders for Project Linus

A couple of weeks ago, I spent some time in Malcolm's first grade classroom, helping the kids make a patchwork block for a quilt.  First, I read Papa and the Pioneer Quilt to the class.  It's a great story, but I think some of the kids might not have had the cultural and historical knowledge to fully comprehend the it.  After the story, I explained how we were going to make quilt blocks and they got to work.

I pre-cut pieces of fusible interfacing that had a one inch grid printed on it.  Our blocks were 5x5, using 2" squares, so I used a ruler and pencil to mark off the two inch squares for them to use as guidelines.  Each child received five pre-cut squares of red, orange, yellow, green, and blue fabric.  I had a few extras if they wanted to trade for other colors to complete their pattern.


Some kids dove right in and started designing their blocks, while others completely froze.  I had to randomly place fabric on some of their grids to help get them started.


This little boy was really into it and was so excited to tell me all about how some of his family members make quilts.  Adorable!


It was a little chaotic and the children worked at various paces, but for the first time doing this exact project, I thought it went really well.  Especially at this age, there is such a wide variation of abilities.


Once they had their pattern laid out the way they wanted it, they used glue sticks to tack the fabric to the interfacing grid.  I just needed them to hold together long enough for me to get them home without losing their design pattern.  Once I had them home, I repositioned the squares as needed and ironed them on to the interfacing.

There was a wide variety of abilities in being able to place the fabric squares on the grid.  The one in the lower right hand corner was done by my just turned four year old daughter.  To make the quilt come out even, I made a block of my own too, but it is not pictured here.


I have been asked by a few people why on earth I would undertake a project like this.  First of all, crazy as it is, it is a lot of fun for me, but I also feel like it is important for the kids to have this experience for a number of reasons:

1.  Getting to see how something is made.  It wasn't that long ago that children were surrounded with everyday activities that exposed them to how the things in their lives came to be there.  Garments were sewn at home, articles were mended, and quilts were made from scraps.  Children were often involved in these activities and observed them until they were old enough to help.  Now, we throw way clothes when they get ripped and rarely make something new ourselves.  Seeing the work involved in sewing something is important and I let my children help and watch me work so they can see the time and care that goes in to making clothes and blankets.

2.  Expanding their creativity.  It was interesting to me, how many children froze when given the open ended instructions to create any pattern they wanted on their block with their bag of fabric squares.  If we don't give them opportunities to experiment with colors and patterns, how can we expect them to be creative later?


3.  Getting to work with different materials.  Fabric is not a typical material for children to get to work with.  It feels and behaves very differently from paper and offers them an unusual challenge.  

4.  Seeing that something they made is beautiful.  Just seeing how beautiful their finished block is can be encouraging and empowering to the children.  They are typically very proud of themselves.  Hearing, "That one is mine!" is very common when they are looking at all the different blocks together.

5.  Being a small part of something bigger.  While each individual block is wonderful, they are even more impressive once they are all put together.  One square would not work as a blanket, but when several are put together, suddenly there is something even better and more beautiful than what we started with.  This is a very concrete example of a concept we often try to teach small children.

6.  Community service and helping others.  Helping others is a very abstract concept for many children, but most can understand being frightened and wanting a blanket to comfort them.  It makes them feel helpful and special to help another child who is scared and will be so grateful for the quilt that they helped to make.


Once I had all the blocks sewn, I tried a few different layouts.  Four children just happened to do stripes as their design.  Since I am typically all about symmetry, I experimented with them in a few locations.
 I thought I would like them best in the center, alternating vertical and horizontal stripes.  This probably would have also looked fine, but it wasn't what I went with.


 I tried them in the four corners, but running vertically made the quilt look too long and out of proportion.


 Turning them horizontal looked really good, and was the one my son (whose class it was) liked best, so we went with this layout.


 I added a dark grey and black sashing and border that has concentric circles.  I liked the visual texture and the grey gave it a much softer look than the blacks I tried.  Here, it is pinned to the black utlra-cuddle backing and ready to be quilted.


 All finished!  For the quilting, I just did a very quick straight run on the diagonal, from corner to corner of each block.  My stitching isn't perfect, but it isn't horrible either.  I'm still new to the actual quilting part, and this one was larger than the others I have done.  A few times, the bulk of the quilt pulled things out of alignment a bit and I had to readjust.  I bound it with strips of the same fabric that was used for the blocks.

One of the best things about working with the kids is that they push me out of my comfort zone quite a bit, and I need that.  I love the randomness of the blocks, yet there are still patterns to be found.  None are patterns I would have created, but they work together beautifully.

I wish that I had taken a few close-ups of the fabric to show the subtle patterns.  The quilt is currently on display at the school.  Later, I will bring it home, wash it, then donate it to Project Linus.  I just started another quilt with my daughter's preschool & kindergarten class, so I will take both quilts at the same time once that one is also finished.

Wednesday, January 8, 2014

New Leotard! (finally)

Each summer, the kids take a break from gymnastics.  Then, if they want to do it again the the fall, they start again then.  Just before summer started, Dorothy had outgrown one of her leotards, and the other was starting to get a little short in the girth.  When it was time to sign up for Fall classes, she didn't want to do gymnastics, and opted for a basketball and soccer class instead.  She hated basketball and soccer, I'm not sure exactly why, but the fact that she can't run very well (she's slow, and it is more of a jog, with an occasional skip/hop in there) might have been part of it.  Once that was over, she wanted to go back to gymnastics, and I promised I would make her a new leotard.

Well, she did an entire session in the one that was too small, because I didn't get it done.  I eventually, forced her to wear one that we received in a box of hand-me-downs because it actually fit and she would not be tugging at it every few seconds.  She hated that leotard for some unknown reason.  I promised her that she would only have to wear it for one week.  We picked out fabric (from my stash), agreed on a design, and I even got the front cut out.  Then I realized that I had cut it the same size as the one that no longer fit, not the next size up.  *smacks forehead*

I was frustrated and not motivated to get it sewn, so it sat in my sewing room for another two weeks (and she had to wear the leotard she hated, much to her disgust).  Finally, a plan formed in my head and I was ready to tackle the leotard again.  I cut out the back the same, wrong, size as the front.  Then I lined them up and cut them both in half and added a two inch insert of a scrap of bright lime green, holographic fabric so that there would be a band around her lower chest.  I just eyeballed the placement, and it could be about half an inch higher, but it isn't too bad.  Luckily, she is pretty tiny around, because her new leotard is not any wider than her old one, but the band bought her some length.  Hopefully this will last her for a little while.

The pictures are pretty terrible.  The lighting at gymnastics isn't great, and she doesn't hold still long enough for a photo with the lens open just a second longer.

 I embroidered three flowers on the front and the back because she wanted a "soft leotard with flowers on it."  She chose a wine colored stretch velvet for the leotard and agreed to my suggestion of orange, light purple, and hot pink flowers.  I had to surprise her with the green band, but she liked it because it sparkles.


 I had to guess as to placement of the orange flower I wanted on her hip/bottom because I have to do the embroidery before sewing the leotard together.  It got it just about where I wanted it


 Waiting for class to start.


 The colors look a bit off in both pictures (with and without the flash).  It's really somewhere in between how the photos look.


None of my action shots turned out well, but it seemed to move with her nicely, and I did not see her tug at it once, which is a huge improvement over the one that was too small.

Overall, I'm happy with how it turned out. 

Sunday, January 5, 2014

Birthday Banner

I'm terrible at blogging when I get busy making things.  I have a couple of big projects that are going to get underway in the next two weeks, so maybe I can take photos along the way and start updating here again more regularly.

Dorothy had a birthday party today, and I got a chance to pull out this banner that I made many months ago.  I made the "Happy Birthday" part, and Malcolm's name, for his party last May.  While I still had all the supplies out, I went ahead and did her name too.  It was nice to not be rushing to get it done with all the holiday craziness, and it went great with her "painting" theme.

 I forgot to take a picture until after I was almost all done cleaning up.  It looked better with the tables all decorated.


 You can see it a bit in the background here.


Not something I sewed, but the cupcakes turned out really cute and were a big hit with the kids.

Sunday, June 23, 2013

Birthday Gifts

I have made several birthday gifts for my kids' friends over the past few months, but am terrible about remembering to take a picture before wrapping them.

This was a quick picture with my cell phone after gifts were opened:
 My typical gift, the first time one of my kids is invited to a friends' party, is to make a beach towel with the child's name on it.  This is one that I made, but there were two others that I didn't photograph.  Hopefully, the kids like using them all summer.


This is a shirred owl dress I made for a little girl's first birthday.  I guessed on size, but based on pictures I saw of her, it seems to fit.  Yay!  I always worry when I guess, but this style is pretty forgiving.  I love this fabric a lot (the colors are so fun) and have enough left over to make a dress for Dorothy.  It's on my list for next year since she has so many outfits for this summer.


Last, is a towel and bag combo I made for a school friend.  Normally, only one of my kids gets invited to the party, but since they both were invited, I decided to add a bag to my normal towel gift.
 This little girl is monkey crazy, so I went with a monkey theme.  I had the towel first, so then found fabric for the bag that matches.  Actually, Dorothy found the plaid fabric for me.  She loves to go fabric shopping!

Hopefully they can use the bag to tote her things to the beach or pool (or dance and gymnastics class).  The towel fits great in the bag too.


 I usually do some type of "beach" animal on the towels, but love how the monkeys turned out.  I might have to experiment with other animals.


 I've been wanting an excuse to try out this design.  It took me three attempts to get it right because I hadn't noticed that the design was just a touch too large for my hoop.  Once I resized it, it stitched out wonderfully.  It took almost two hours of stitching, and had a ton of thread trimming once it was complete, so I'm not sure how often I will do this one.  Malcolm wants it on a shirt; we'll see if I managed it.


 The bag wanted to flop open a bit, so I added a small snap right in the middle, and that helped a lot.


I love the banana lining fabric I found!  It's so cute, and it matches the bananas on the monkeys' bed perfectly.


I have one more towel and bag combo I'm working on; in a boy style (Batman!).  The towel is complete, and the bag is getting close.  I broke my last needle though, so I need to get some more so that I can finish it before the party on Friday.

Sunday, May 19, 2013

Patchwork Rainbow Dress

I saw a picture of a rainbow patchwork dress on a friend's Pinterest page and fell in love with it.  I just had to make it, and I'm glad I did.  It is possibly the brightest, happiest thing I have ever made.  However, I probably won't be making it again because it took forever to get finished. 

I started the dress a month or two ago, and it was going well.  I just did a little here and there as I had time to work on it.  There are a lot of little steps, so one day, I would just cut fabric strips, another I sewed them together, later I cut them to length, etc.  My daughter got an invitation to a "princess birthday party" and was to wear her princess-y best.  She doesn't really have any fancy dresses right now, but I figured the twirly rainbow dress would be perfect; I just needed to finish it.  Let's just say, I'm glad it's done.

 The top really should have been a little bigger, but the bottom of the dress has massive amounts of fabric, so I cut a few corners to keep the fullness from being so much that she couldn't move easily.  It's still very cute though.


 When I first tried it on her to check the placement of the straps, they were placed too wide and were a little long.  I ripped them out on the back only and moved the to the center.  I love how it looks and it fits much better now too.


I think this might be our favorite summer dress this year.