Monday, October 31, 2016

Happy Halloween!

This year's Halloween costumes were a joint effort between Kevin (and Malcolm) and myself. 


Malcolm wanted to be a Roman soldier, so he and Kevin made his breastplate armor and helmet.  Malcolm learned the joys of using the hot glue gun, and the pain of velcro not holding his costume together.  In the end, we used duct tape to hold it together and only had to repair it once while out trick-or-treating.


The only parts I "made" were the tunic, cape, belt, and arm gauntlets.  The cape and tunic were two mens' size t-shirts.  I took in the shirt on the sides so the tunic wouldn't be quite so huge.  The cape is just the back of a shirt, with a piece that had been cut off, sewn to each shoulder to create a neck hole.  The gauntlets are cut from flannel backed vinyl I found in the remnant bin of the fabric store.  I also cut strips from the vinyl for a belt, and leg straps.  He wore the leg straps to school, but we left them off when it was time to hit the streets, in favor of pants.  Poor kid was cold at school.


 After changing her mind over and over again, Dorothy finally settled on being Belle for Halloween.  I looked at tons of patterns and examples of costumes people had made, and decided to use a basic "fancy dress" pattern and just change the neckline slightly to make it look more like Belle.  I decided to just do the small pick-ups on the skirt instead of the full shearing to get the draping effect of the dress in the movie.  The pick-ups kept the skirt light enough to still be light and flow-y, which I thought was important.


 A friend loaned us a fake hair piece, and it really helped finish the look.  Dorothy's hair is just in a tight bun, then I stuck the hairpiece in front of the bun, pulled it around, and secured it with a rubber band and sparkly yellow ribbon.It held really well, and she looked so grown up with her hair done up this way.  It was fast and easy too.


Dorothy was adamant that she wanted gloves to wear with her costume, and she felt so fancy with them.  She wanted me to add sparkles to her costume, but I argued that Belle doesn't actually have a sparkly dress.  That, and I was out of time to do more to her costume.  I did have a rhinestone button, left from a different project, that was perfect to cover the center gather on her shoulder piece.


 The weather at Halloween can vary quite a lot, and we were afraid she would be cold in just the yellow Belle dress, so I suggested that I could make her the cloak that Belle wears in the snow, earlier in the movie.  The cloak turned out beautifully, and what little girl wouldn't want a red velvet cloak trimmed in white fur.  Side note, I will never sew with fur again!


It was fairly warm, but she wore the cloak for trick-or-treating.  I figure she can wear it again at our town's Dickens in Dundee Christmas festival, and if we walk in holiday parade.


Tuesday, September 13, 2016

Liberty Dress

This dress has been a long time coming.  I put it off as long as possible while Kevin and the kids were camping, but I finally buckled down, finished it, and I love this dress!  I want to make more of them, with slight variations.  Maybe for next summer. 

 The fabric on the bodice and the lower skirt is from Liberty of London.  I bought it, and 4 other fabrics, when Kevin and I visited London a couple of years ago.  It is easily the most money I have ever spent of fabric, and I was nervous to cut into it.  It has just been sitting, waiting for the "right" project.  I finally had to push myself to just use it already.  Even then, I procrastinated out of fear of wasting my precious purchase.

The center, coral panel was a fabric I had on hand, and it was a perfect match for the Liberty fabric.  It doesn't show in the photo, but the coral has tiny little swirls in a tone-on-tone scheme.  It's really delicate, and has some texture to it.  I went back and forth trying to decide if I wanted the center section different or not.  I think it would have looked fine either way, but I'm happy with how this one looks.


 I used Simplicity pattern 2377 as my guideline, but made a couple of minor changes to the original pattern.  I wanted a little more fullness in the tiered layers, so the coral is a little longer than originally called for, and the Liberty fabric at the bottom is about two-thirds longer than the pattern is set for.  Honestly, both could be even more full, but I cheated a bit and just used the full width of the fabric.  A single width for the coral and double that for the Liberty.

I don't know how much longer she will enjoy having me make dresses for her, so I might as well do a few more while I still can.


It's hard to see in the other photos, but the Liberty fabric is sort of a funky damask style.  It looks very traditional from a distance, but there are octopi all over it, and little hidden anchors.  I centered one octopus on the front bodice, and there are two rows of them on the lower skirt.  I like that this dress looks pretty traditional, but has a little surprise in the details.

Now, what will I make with the rest of my fancy Liberty of London fabric?

Monday, September 12, 2016

Camping Weekend

Kevin took the kids camping this weekend.  Since I don't camp, I had the house all to myself, and I took the opportunity to finally tackle a few things in my sewing room. It's amazing how much I can get done when there are zero interruptions.


First up was finally finishing the tooth fairy pillow I started for Dorothy a long time ago.  It was all cut out and the embroidery and applique were done.  I just had to sew it together, stuff it, and sew up the hole.  Quick, but it would have been quicker if I had remembered to add the ribbons before sewing it up the first time.


A closer look at the embroidery.
It's a good things I finished this, because she lost another tooth the day they came home.  It works!  The tooth fairy found her tooth in the pillow just fine.


 Next up was a new t-shirt dress for Dorothy.  I love this style of dress on her and they are so quick to make.  I lucked out and found the blue shirt on clearance at Target.  It matches wonderfully with the fabric.  Too bad she didn't have this on Friday when she was to wear a blue shirt to school for a special event.  Why do I never have the "right" colors when stuff like that comes up?


 When she came home and saw the dress, she was really excited.  The skirt fabric is rainbows and unicorns, and it truly hideous in a way that only a six year old could love.  I bought a mystery box of remnants a while back, and this was one of the treasures in the box.  Never in a million years would I have chosen this fabric, but Dorothy loved it the minute she saw it.  The remnant was the perfect size to make this style dress, and I don't have any left over.  The dress is a touch long, but that is so she can still wear it next Spring.  The weather is starting to get cooler, so I'm not sure how much wear it will get right now.


 Here's a closer view of the "beautiful" fabric.  I'm glad she's happy and that I found a good use for this piece.


Lastly, I finished the last few of my 120 rainbow string squares for a quilt I'm making.  I still need to set the layout and piece together the top, then quilt it, but at least the squares are finally done!  It took a lot longer than I had anticipated to sew these strings together.  I hope it turns out as pretty as it is in my head.

I also worked on another dress for Dorothy that I had been putting off because the fabric intimidated me.  All I have left to do is hem it and trim the threads, so I'm hoping to finish it so she can wear it tomorrow.  That dress is more my style than the rainbow unicorn one, but she likes them both.

Kevin should take the kids camping more often so I get more done.

Saturday, July 9, 2016

Unicorn Rainbow Baton Twirling Costume

Dorothy needed a new solo costume for twirling competitions because despite letting out the one she had, her bottom would not stay covered.  Since she is in the youngest age bracket, I figure that it is fine to play up the cuteness factor as much as possible.  I had some teal stretch velvet fabric left over from a previous project and knew that it would be a fantastic color on her.  Two of her favorite things are unicorns and rainbows, so why not?  I already had a unicorn design for my embroidery machine, so I just used that.

I cut out the base leotard, sewed up just one side, then embroidered on the unicorn before closing the other side seam.  That made it much easier to get the unicorn on the costume without stretching the material out of whack.  I hand sewed some beaded detailing and did that before I lined and finished the costume.  That way, the lining is smooth and the stitches are hidden behind the lining.

Despite cutting out the pattern with the length of a size six and the width of a size five, the leotard was still a bit too big around on her and I had to take it in a bit under the arms


I think the back turned out very cute.  You can barely see it, but I did some light blue rhinestone on the straps across the back.  There are also a few rhinestones across the binding on the front.  The are subtle, but added just the right amount of sparkle up closer to her face.


 Doing a "fade" for the end of the rainbow was more difficult than I anticipated.  I think it looks better from a distance.


 Close up of the unicorn.  The details of the legs, mane, and around the horn are all seed beads that I sewed on.  I'm thinking about adding a black rhinestone for the eye.  Outlining the unicorn in rhinestones seemed like a lot up close, but they just barely show up from a distance on the gym floor.


 Here are a few actions shots:
 During her solo where she placed first for Nov 0-6 State solo champion.


 At attention, waiting to start her basic strut.


During basic strut, which we need to put a little more time into.


The lighting was better in the practice gym, and I got a few cute pictures of her practicing and playing around a little.


 I had just enough of a scrap of fabric from the leotard to make two little bows for her hair.  I thought they looked sweet on her and really finished off the look.


 Sometimes, she stands up tall, and looks really confident and sharp.


This move always kills me.  She just looks too adorable when she does it, and really throws herself into the lung each time.

Dorothy had lots of positive comments from other twirlers and moms at the State competition.  I'm glad I finished it just in time.  She will Wear it at Nationals, and hopefully it will still fit for all of next season.  It's pretty stretchy, and there is a little room where I can let it out, so that should help.

It took forever to glue all those rhinestones on, but I'm so happy with how this costume turned out.

Tuesday, June 28, 2016

New Bating Suit

Dorothy has been in dire need of a couple of new bathing suits for a while now.  I have been squeezing her into a couple from last year, but they are getting pretty tight on her.  I finally finished one of the two I have planned, and she was able to wear it to her last swimming lesson (for now, they will continue with lessons in September).  I have everything I need to make her one more, but we shall see how long it is until I get around to it.  I decided I had better take pictures of this one right away; before I forgot.

 From the front.  I loved this bright, bold striped fabric, and bought it on clearance last year.  Not only is it cute, but she is high visibility and easy to spot in a sea of kids at the pool.  Unfortunately, indoor swimming lessons don't make for the best photos, so we took a couple in the yard before leaving for class.


 The back.  I love how the stripes turned out on the banding and that I was able to line them up in an alternating pattern across the upper back.  It really helps visually break up the thick stripes.  I also love how having the stripes on the skirt going horizontally, makes it look more ruffle-y.


This suit should fit for a nice, long while.  I made the top a smidgen long, because she prefers her tummy to stay covered.  I was worried that the bottoms might slip once they were wet, because they just fit around her waist, but they seemed to stay put. 

She was so happy to have a new bathing suit, and this one looks just darling on her.

Friday, May 13, 2016

Third Grade Class Quilt

I recently made a quilt with Malcolm's third grade class, and I think it might be my favorite class quilt yet.


I tried something a little different this year.  First, I read them The Quiltmaker's Gift, by Jeff 
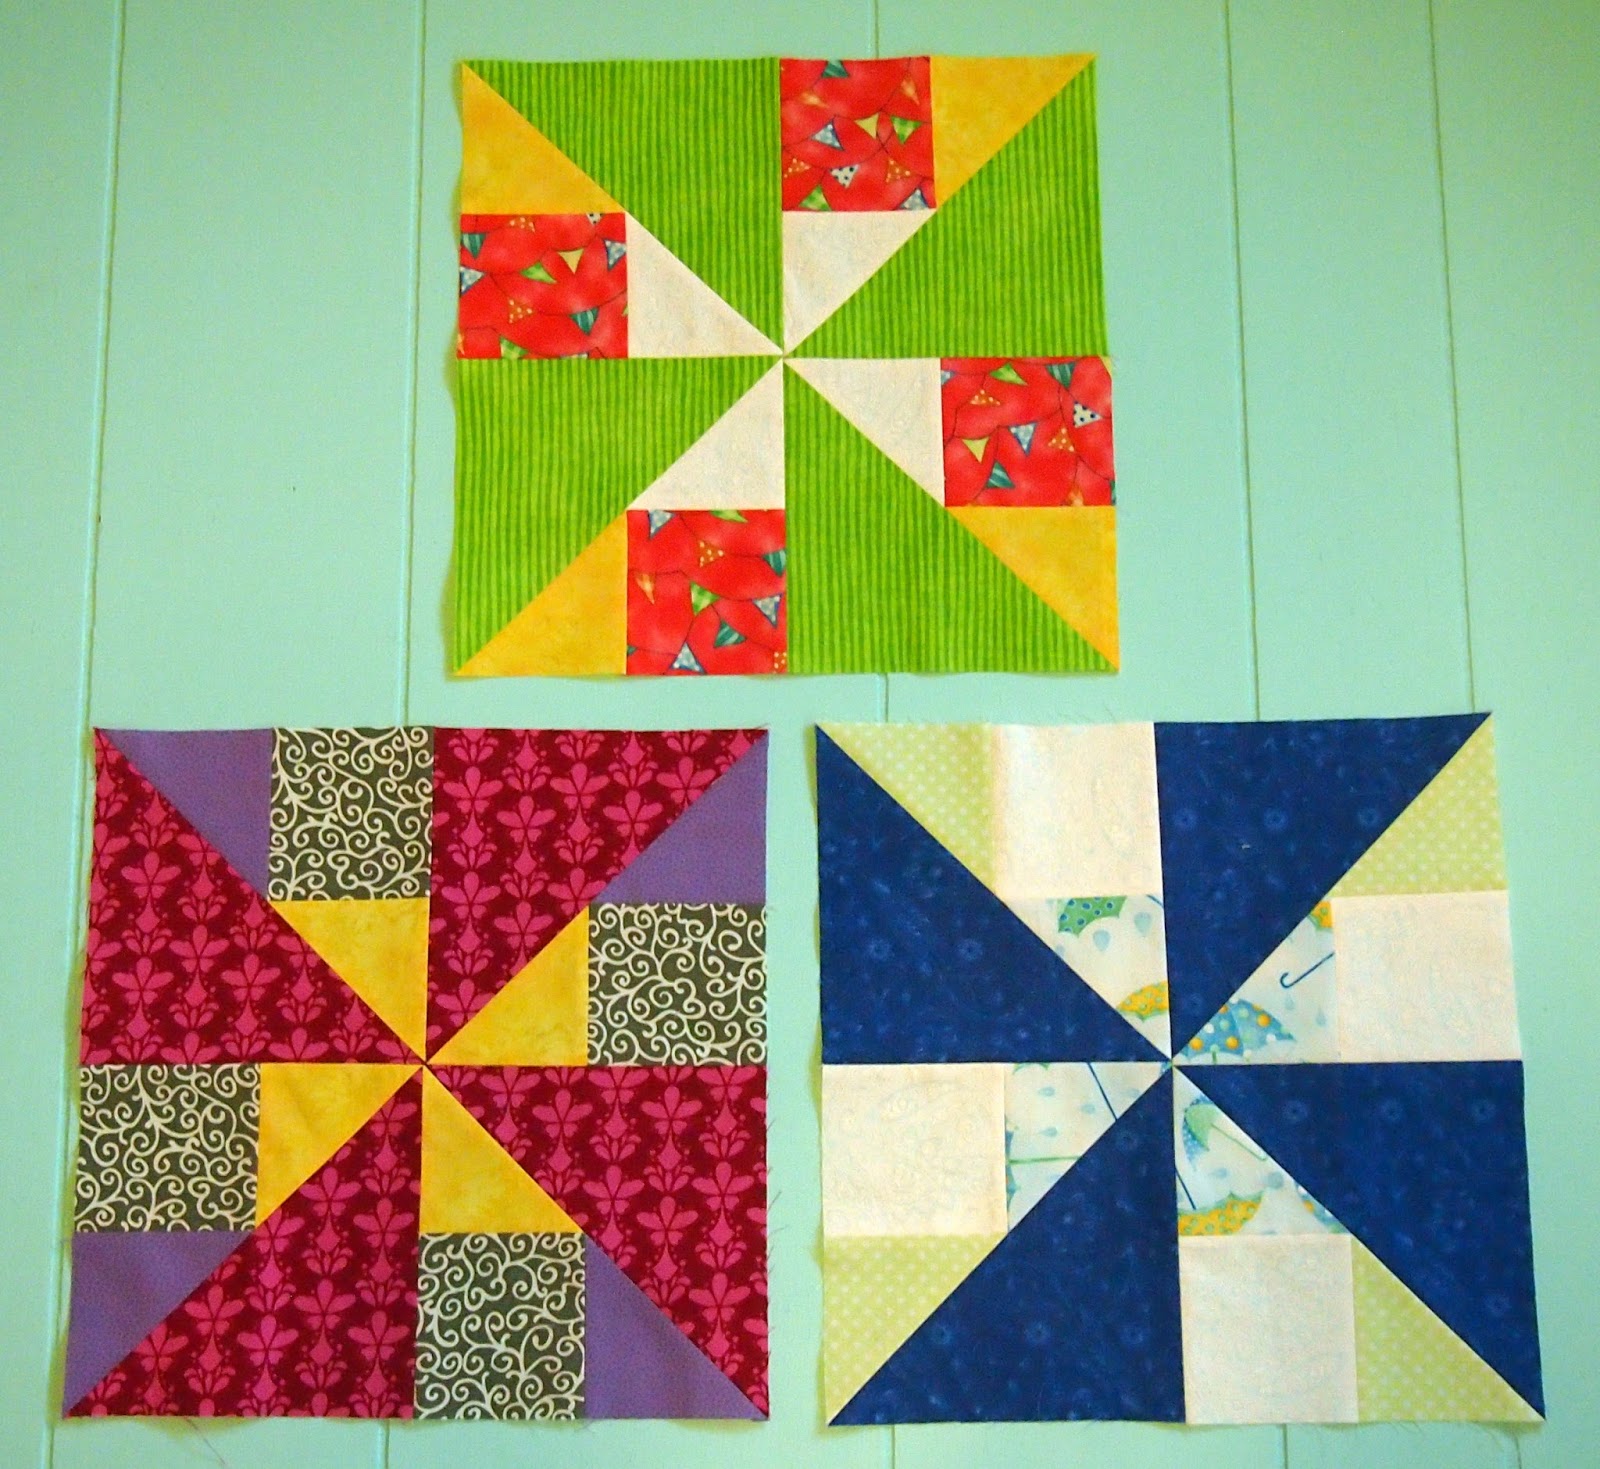
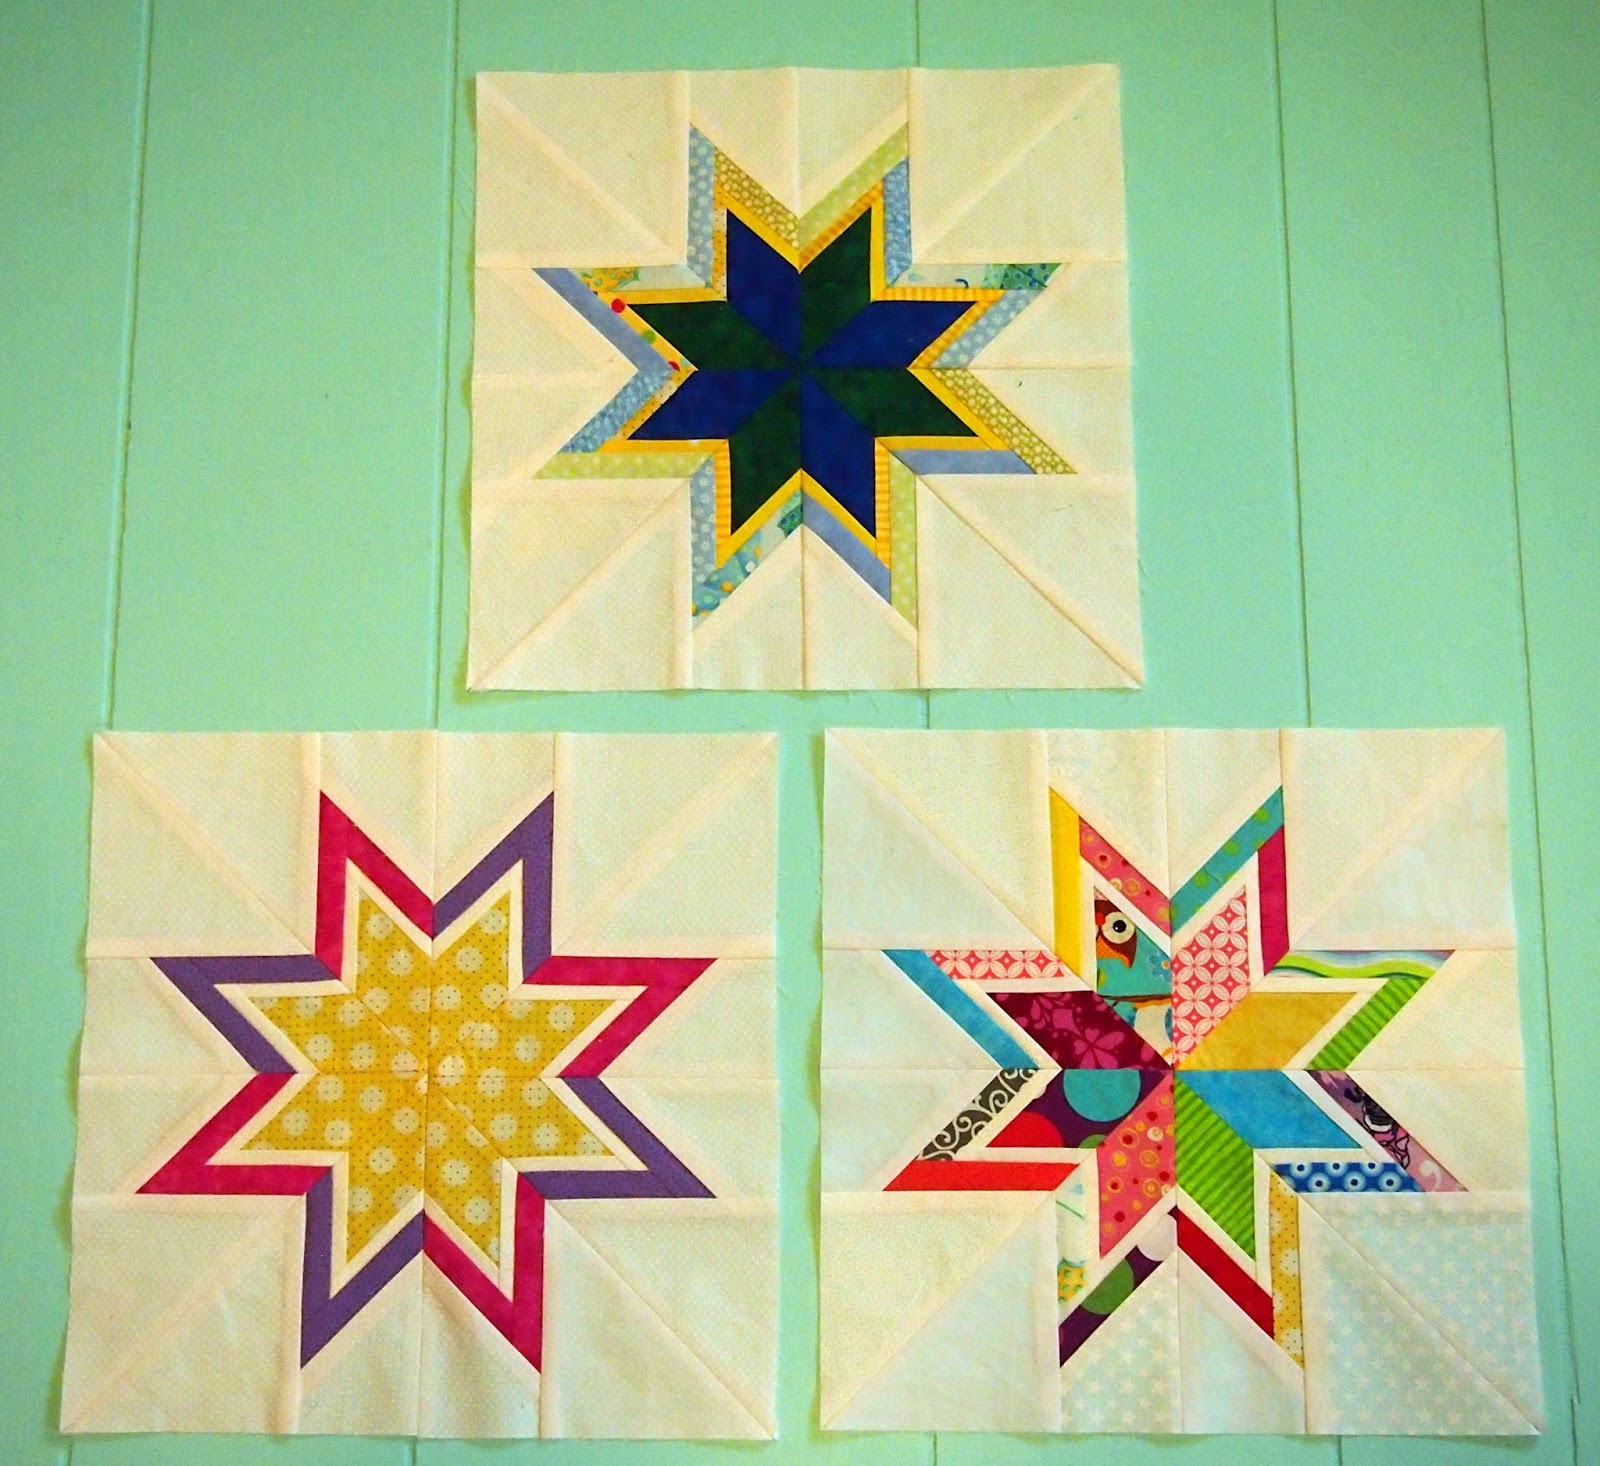
Brumbeau.  Then, instead of giving everyone the exact same fabric squares to work with, I had five groups, with four students in each group.  Each group was assigned different color.  They got a container with a variety of fabrics in "their" color that they had to sort through to make their blocks.  Each color had various shades and patterns to work with.  They laid out the fabric choices on a piece of grid interfacing.  Once they were happy with their layout, they used a glue stick to tack down the fabric pieces.


Luckily, It was hat day at school, so in nearly every photo, their faces are covered.


 Some of the kids did random placements, and some had very elaborate designs.


 The purple group had some fabric with glitter on it which was extremely popular.  There were some big negotiations going on to decide who could have the glitter pieces.


 Many students did one layout, then completely removed the fabric squares and started over again.


 Here, she is making rows, but her finished block was very different.


Third grade was a good age to try this with.  They are old enough to be able to follow the instructions easily, and this gave them a little more freedom of choice with their blocks.  I love what the kids came up with and they all look great together.  If I do a quilt with Dorothy's first grade class next year, I think I will stick with giving each child the exact fabric squares they will need.

I took everything home to sew it together, then brought back the finished quilt for them to see.  Showing the completed quilt is easily my favorite part because of all the gasps and, "Whoa"s and the excitement of the kids.  I always hear them pointing out which block they made, and they are very proud of their work.

This class had lots of interesting question for me like, how I made the border of little colored squares, and how I decided which block to put where.  It was a good opportunity to explain the construction process and to let them know how much math I used to figure things out before even coming to their classroom.

After showing them the quilt, I hung it up in the hallway of the school and made a small bulletin board display with the photos I took, the book jacket, a couple of small write ups about how it was made and where the quilt will go, and some extra fabric squares.  I wish I had taken more photos to fill up the bulletin board.  Maybe next time.  It will be donated to Project Linus once it is no longer hanging at the school.

 Here's the quilt and bulletin board at school.  I forgot to take photos of the quilt at home, so I did all my pictures once this was done. 


 Slightly closer look, without all the extra stuff around the edges.


 Slightly closer look at the blocks the kids made.  The depth and texture just doesn't come across in photos.  It is quite stunning, in person.


The third row is sewn straight, it's just laying funny because of the edge of the bulletin board behind it.

These projects are always a lot of work, and partway through I wonder why I'm doing it.  The kids are so enthusiastic when I come back though, and that's why I do it.  I'm always pleasantly surprised how much they like doing these.


Tuesday, May 3, 2016

Hedgehog Shirt

I made Dorothy a hedgehog shirt to match a pair of capri pants for Spring.  I have a lot more things I want to make her for this summer, but this is all I have finished so far.  I took these photo after school, so she's a bit disheveled from some hard playing.

 Close-up of the hedgehog.  I made her a shirt with the same design last summer, but that shirt is too small this year.  I still really love the happy little hedgehog though, so I made another shirt, in different colors, for this year.


 The whole shirt.  The shirt itself is nice soft green, but it turned out lighter in my pictures. 


 The whole outfit.  The capri pants are from Janie and Jack, but I bought them at Goodwill for only a couple of dollars.  They are cute and nice and comfy for these spring days when the temperature fluctuates a lot during the day.  They are plaid with a couple of shades of pink and green with some white.


 Just a cute shot from the back.


Probably the closest to the what the color of the shirt looks like.

Hopefully, she can wear this a several times before it gets too hot for longer pants and all she wants to wear is sundresses.

Saturday, April 30, 2016

Quilt Block Swap

I signed up for my first ever quilt block swap, and I just finished all my squares to send off.  Basically, I have three "buddies" and I make four blocks for each of them.  They do the same for me, and then we make a quilt with the blocks we receive.  We could specify the colors or style of fabric we prefer, but then it is left up to each person to decide what kind of block to make.  Here are the ones I made and will be mailing out. 

 Brave World:  I don't usually make traditional style blocks, so this was the first one I tackled.  It was really easy and went together quickly.


 Dolly Madison:  These were my second block that I made.  These were my favorite and I really like how they turned out.  I love different they look based on how dark or patterned the fabric is.


 Confetti Stars:  These were my first ever attempt at paper piecing.  When it went right, I really liked these, but I made a lot of mistakes while learning.  I think I finally got the hang of it by the end.


 Lone Starburst:  My final paper piecing square.  I experimented a lot with combinations of using random fabric and carefully planning which colors to use.  I like how all three turned out even though they are all very different.


 Buddy #1's blocks.  She requested blue, green, and yellow. 


 Buddy #2's blocks.  She left the colors up to me, but requested bold, modern fabrics.


Buddy #3's blocks.  She left the colors pretty open, but requested bright colors in jewel or sunset tones.


I have already received my first set of blocks.  Once I get the rest, I will put them together into a quilt.  I decided to go a little funky and requested orange, yellow, and purple as my colors.  We shall see how it turns out, but it should be very bright and happy.