Monday, September 28, 2015

T-Shirt Dresses

I was recently on a roll and made three dresses out of t-shirts.  They are very quick and easy, especially if I use ribbon as the sash instead of making the sash from a coordinating fabric.  I have a couple more of these planned in long sleeve styles if I can find the right color shirts to match some fabric I already bought.

First, I made a Hulk/superhero themed dress for Kevin's cousin's daughter who is obsessed with superheros.  Her mom asked if I could come up with something because she wasn't having any luck finding girl superhero clothing.  I wasn't happy with my first attempt of a peasant dress, so I also made this dress since I had enough fabric left over.  Manufacturer's are really missing a key target demographic here.


 It was really hard to find a shirt that matched the fabric.  I didn't really want a V-neck shirt, but it was all I could find quickly.  I was shopping in that window where the short sleeve summer shirts were all on clearance (I would have preferred a short sleeve shirt), but the store only had the first set of long sleeve shirts in stock.  I'm hoping there will be more options in October because I'm still driving around with one more fabric I'm trying to match.


 The Hulk is the little girl's favorite, so I added an applique of the Hulk fist to the bodice.


I made the sash fairly wide to show the superhero faces as much as possible.  It ties in the back, and I sort of like the over-sized bow it makes.

This was my first attempt at this style and I learned a lot making this dress.  I made a few small changes for the next two I made and I think I have hit on the right combination to get them made just a bit better.  Here are a couple of tips for those who might want to try it:

1.  Iron about an inch of fusible interfacing to the inside of the shirt along the edge where it is cut off.  It will keep the knit material from stretching as you sew on the skirt.

2.  Sew the sash just above the edge where the shirt and skirt meet, sewing through the interfacing and the seam.  I didn't do this for the superhero dress, and I wish I had.

3.  Just sew the top edge of the sash across the front and down the side seams; leave the back unattached.  It seems to lay well this way.  You can tie it tight in the back and you don't have to worry about the skirt gathers being straight since you are not stitching over them.  I have not had an issue (yet) with the sash trying to flip up.  It has stayed put, so far.

 Dorothy wore this on her first day of school.  I started and finished it about two days before she was due to go back.  Nothing like waiting until the last minute!

I found the shirt on clearance for about $2, and it looked great with the school themed fabric I have been hoarding for a couple of years.  I love the detail of the little bow on the pocket.  I put a wide hem in this one, and hope that she can wear it again next year on her first day at a new school.


 I bought this fabric a couple of years ago without a good plan other than, "It would be cute as a first day of school dress."  I'm glad I finally used it.


I gave Dorothy the choice of two different ribbons and she chose this red one with white stitching on the edges.  I think she made a great choice.  I love that I can tie the dress a bit tighter around her waist, so it isn't so shapeless.


 It was fairly cool the morning I made her pose for a couple of quick photos, so she isn't overly enthused here.  She just wants to put on her sweatshirt.  I found this shirt on clearance the same time as the yellow one.  I wasn't sure if I really liked it with this fabric, but I wasn't having any luck finding anything I liked better, so I went for it.  Now that it is all together, I really like it.


 This sash is made with some yellow fabric I already had, leftover from another project.  I like the color a lot, but it is much more difficult to tie tightly than the ribbon, so I don't think the dress lays quite as nicely.  It came untied at school, so I'll have to be sure to double knot it from now on.

I layered the dress with some leggings since it was a cool morning.  I'm hoping that both of these dresses can be worn spring, summer, and fall, with the addition or removal of layers.


This was another fabric I bought a long time ago just because I liked it and though it would make a cute dress.  The little kids remind me of the dolls in the It's a Small World ride at Disney.  I decided that I needed to make a dress with it right now if I was ever going to do it because I'm not sure how much longer she will be willing to wear cute and sweet styles.

I have a Halloween shirt that I need to get working on and add the skirt if she's going to be able to wear it this year.  I want to try a drop waist with a layered ruffle skirt this time though.  Let's see if I can get it done, and I hope it works out well.

Monday, June 22, 2015

Disney Outfits

For our trip to Disney, I made the kids a couple of things to wear.  Dorothy had been asking for princess dresses (not costumes, but clothing with characters on them) for a while, and this was my compromise.  I'm not a fan of most character clothing you can buy in stores, but I thought I could find some fabric to make her a dress to make her happy and be more in my taste preference.

I purposely picked styles that I thought would be comfortable to wear all day in the Florida heat.  I was surprised at how many little girls we saw in the park wearing those cheap, polyester princess dresses.  I can't imagine anything less comfortable or more miserable to wear at Disney.  Dorothy seemed happy in her cotton dresses and knit shirt and skirt combo and I thought she looked just as cute (or even cuter), and way more comfortable, than those in full princess regalia.  

 For our first, partial day when we drove over and just went to Downtown Disney and checked into the hotel, I made this cute little toile dress for Dorothy.  When I was shopping for fabric there were two that I really liked, but knew I only needed one.  My personal preference was for the toile, but I knew that she would like the other, brighter one, better.  I went ahead and bought both, even though she really only "needed" one. 
 
 I made this one last, and I was literally trimming the threads in the car on the drive down.

 The pictures I took at Downtown Disney didn't show off the dress very well, so I took some pictures after swim class this week.  It got a bit wrinkled in the swim bag, but you can get the idea.  The top and the bottom ruffle are a pale green with white polka dots.  The three ribbons on the bodice and along the top of the ruffle are Minnie Mouse heads.  The toile fabric is princess themed, but the Minnie ribbon matched perfectly, so I combined the two.  The effect was still pretty subtle and I don't think most people who see the dress even realize it is Disney themed unless they take a closer look.


 The back.  It has a shirred back and the ruffle straps come to a V.  The pattern said to have them attach with a button, but I sewed them on since she had no trouble getting in and out of the dress with them attached.  The dress is just a touch big and I'm hoping that maybe she will be able to wear it next year too.  The straps are really long, but I didn't cut them.  I just tuck them in and then I can let them out next year if needed.

Instead of a narrow hem on the sleeves and the bottom ruffle, I opted for a rolled hem and I really liked how much easier that was to do.  It still looks polished, but was so much less hassle.


 Closer view of the Minnie Mouse ribbon.


 Closer view of the toile.  It has Snow White, Belle, Cinderella, and (not in the picture) Sleeping Beauty.


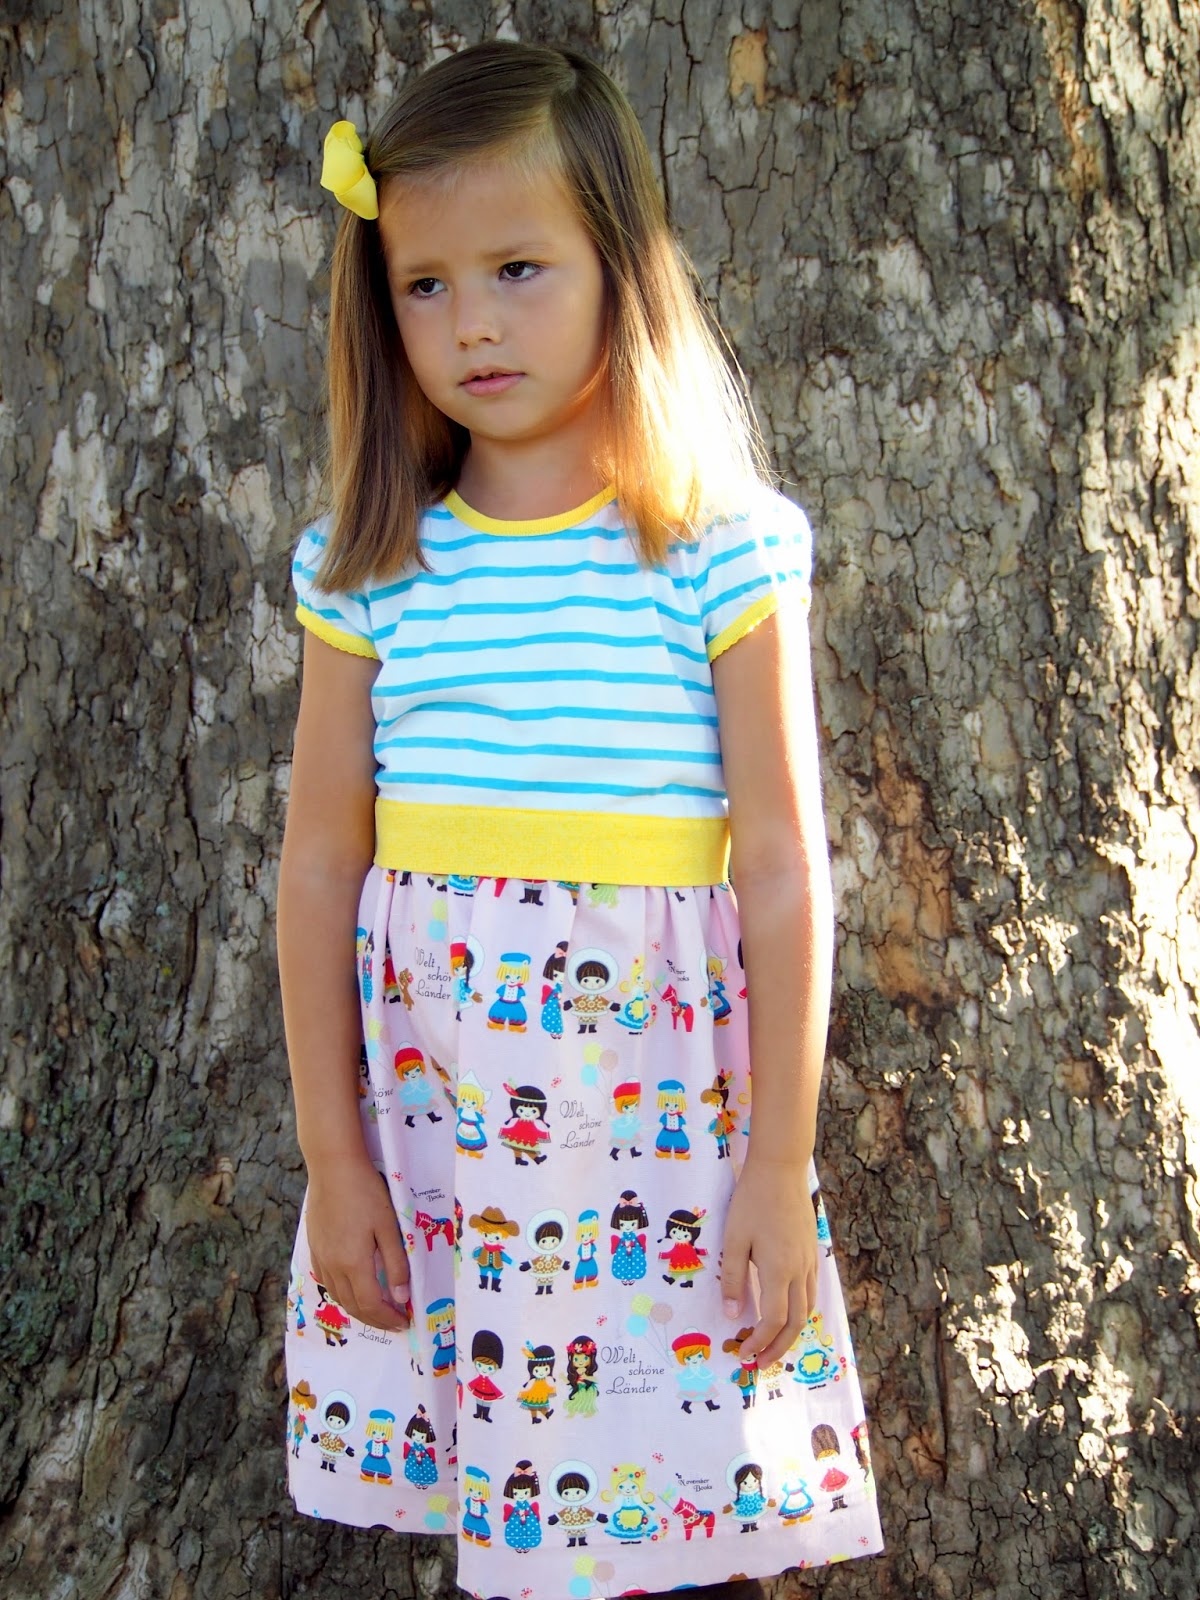
 For our first day int he park, I made each kid a Mickey/Minnie shirt.  I was going to just do Mickey for Dorothy too, but she specifically requested Minnie.  When I found the fabric for the bow that matched her skirt (purchased) so closely, I knew she was right and Minnie was the better choice.


 I found Malcolm's shorts and shirt at Kohl's.  I like that even with the Mickey shirt, he still looks age appropriate and not like a toddler.  I wish the shorts came one size smaller, but I bought the smallest they made.  He wears a size smaller on the bottom than on the top, but I bought both in the "big boys" section and an 8 is as small as they go.  I have the adjustable waist elastic pulled really tight and I wish they were a touch shorter.

I outlined his Mickey in a dark grey to match the shorts a bit and to make it stand out a bit more.  I like his name in the bright yellow and it really pops on the red shirt.  I wanted to do her name in yellow too, but it just didn't look as nice.  I decide to make the coordinated instead of completely matching. 


 Kevin picked up Dorothy's outfit at Hanna Andersson on his way home from work after I called and had them hold it for them.  Thanks, hon!  I really wanted the red shirt that was supposed to match the skirt, but they just were not close at all, so I had to go with the white instead. 

I really wanted to put her hair in pigtails with the Mickey ribbon I had bought, but she refused.  We compromised on a pony tail.  She wanted her hair down, but it was much too hot for that.


Not something I made, but check out her yellow sandals.  I thought they were a cute touch on her Minnie Mouse inspired outfit.


It can't be seen in the pictures, but the Mickey and Minnie heads are this black treble clef fabric.  I like the texture and depth it gives the shirts, and it gives it a bit more personalization than just a solid black.  And I already had it, so it was free to use.

 For our last day in the park, I made Dorothy an apron dress with the other Disney fabric I liked.  The black/grey, aqua, and purple are just simple patterns like tonal dots, medallions, and a printed on eyelet pattern . 


 The pink fabric has a purple silhouette of Sleeping Beauty's castle.  Sleeping Beauty, and some roses are in black.


 The ribbon trim on the apron has silhouettes of Cinderella, Sleeping Beauty, and Belle, with Cinderella's castle.  I liked that it kept the silhouette theme going, the purple matched, and the other colors add a little contrast to the other fabrics.  Dorothy likes it because it means more princesses!


 I didn't get any decent pictures of the back of the dress at Disney, so here's another after swimming photo.  Today, it was raining, so I couldn't even take the picture outside.  Oh, well.  You can still see it here. 

It's a tiny bit big around even though I added a wide elastic across the back.  It's not terrible, but it should fit her better next year.  It was nice and cool at the park though.


I did not make Malcolm's shirt, but I did special order it.  I had offered to make him something and asked him if there was any Disney movies he really liked that I should try to use as inspiration to come up with something.  He wanted a Bedknobs and Broomsticks shirt.  Well, um, yeah.  I actually found this one online, thought it was adorable, so I just bought it.  It has the substituiary locomotion spell (makes inanimate objects move) on it along with a suit of armor and the white rabbit from the movie.

Dorothy and I got several comments of the two dresses I made and it was interesting to see what people's assumptions were.  Some assumed that I had bought them and asked where I got them.  Dorothy wore her Rapunzel dress that I had made her last Halloween for a princess dinner at our hotel.  After dinner, she and I were walking around a bit and a mom was admiring her dress and asked where I found it.  I told that I made it and she was very impressed.  I heard her telling her husband as she was walking away, "Can you believe she made that?!"  That's always nice to hear.  A couple of other moms and a grandma (I'm assuming) were disappointed that couldn't buy the cotton dresses someplace in the park.

At least one lady assumed I had made the apron dress, which I never know how to take.  Does it look too home made or are they just familiar enough with children's fashion sewing to recognize popular patterns?  This one might have been a bit of both because I didn't get the fit quite right, despite trying to customize the pattern to Dorothy's measurements. It looks like it will fit beautifully next year. 

Several people didn't ask about the dresses' origins, but did compliment her and me that they really liked her dresses, which is always nice.

I had one more (non-princess) dress I had planned to make her for this summer.  We shall see if I get around to it or not.

Thursday, June 18, 2015

One Pattern, Four Suits

I made a couple of bathing suits for Dorothy last year because I couldn't find any in stores that fit her at all.  She is very tiny around, with no butt and skinny little legs, so the ones that are small enough around, aren't long enough; even the two piece ones.  This year, I didn't even bother shopping for her, I just made her some bathing suits instead.  I came up with four different designs, using just a single pattern.

 This pink polka dot suit was the first one I made and I made a few mistakes with it.  I didn't have my settings quite right, so the cover stitching doesn't look as clean as I would like, but I'm probably the only one who notices.

This suit is a two piece with a skirted bottom.  I had planned for the top to just come down and meet at the waistband of the skirt, but it was too short.  I didn't take into account that when they are not stitched together, the top doesn't stay pulled down on its own.  I though it looked cute with a little tummy hanging out, but she wasn't going to wear it without the top reaching the bottom, so I added a big ruffle/skirt thing to the hem of the top.  It isn't ideal, but it isn't terrible either, and she likes it.

 I'm not sure why it's pulling up in the center back here.  It didn't do that a different time she wore it.  You can see that the ruffle on the top lines up almost exactly with the skirt.


 It does get a bit strange and bunchy when wet, but it doesn't seem to bother her at all.

See?  It isn't pulled up the the center back here.  Odd.  I'll have to check that the next time she wears it.

 Of the four suits I made, this one turned out to be my least favorite.  I started with it because I thought I was going to like it the most, and I wanted to make sure I at least got this one finished.

 I think of this one as her "sporty" suit.  It doesn't have any ruffles or frills, but is still adorable on her.  I can't decide if this one, or her other black one, is my favorite.

 This one is also a two piece, but I remembered to add a few inches to the top so that it would meet the waistband of the bottoms.  I added a touch more than I probably should have, but I also had to take a tuck in bottoms to get them tight enough.  If she just gets taller and not any bigger around, she might be able to wear this suit next year too.

 All the other suits have straps that make an X in the back, but this one seemed like a V would be better.


 The fabric was a small remnant I bought for $1.50.  It was much too small for most bathing suits, but fit just perfectly for her size.  I was extra careful with my cutting to make sure the gradual pattern would line up correctly.  You can just see here how the circles on the top and bottom line up perfectly.  I am ridiculously proud of how well I did lining the pattern up.


 The green and yellow animal print isn't something I would usually go for, but I bought the fabric on clearance, figuring it would be good to practice with.  The pattern and colors grew on me and do love the bright, cheerful colors on her.  I bought the solid yellow swim material to break up the pattern a bit and I like how it looks.


 The skirt gets a bit clingy and looks thin when it is wet, but it's still really cute.


 It kept up with her playing on a playground next to a splash pad.


 The pink flamingos on the black background gave it a sort of retro feel, so I added some details with the same pink polka dot fabric as the first suit.  The band across the middle breaks up the all black, and gives it a bit of a high-waisted look.  I like how the pink straps bring out more of the pink and soften the black a little.


 I put three rows of ruffles across the seat of the suit, and I love them so much!  They were much easier to do than I had feared, and they give the suit some texture and keep it age appropriate.  I don't know how much longer I'll be able to get her to wear butt ruffles, so I'm going to take advantage of it while I can.


Even though it is cute, the suit can handle some hard play.

Overall, I'm very happy with the results.  She has four very different swim suits that mostly fit her, and they didn't cost me much to make.

Friday, April 17, 2015

Edelweiss Dress

I made the Edelweiss Dress from Hey June for Dorothy, just in time for our first very warm day.  It was my first garment I have made with my new serger, and other than one minor issue (and having to use the seam ripper) it went really well.  It sewed up much faster than it would have using just my regular sewing machine.

Dorothy measured a size 2 for the chest and a 5 for the length.  I went with a size 4, and added an inch and a half to the length, and it is a pretty close fit.  It's a touch big, but not enough to bother me, and maybe she will get two summers out of it.

I bought the seersucker fabric for a song a couple of years ago, thinking it would make a cute dress for Dorothy.  At the time, orange was her favorite color.  She still likes orange (though her "favorite" changes hourly) and I love the summery print without it being like anything else she already has.

 The front.  Instead of making the ruffles, I used a wide eyelet ruffle I purchased.  I also added the eyelet ruffle to the bottom to balance it out.  I think seersucker ruffles would have been too much, and the eyelet gives the dress a very sweet look. 


 Moving.  The dress falls just barely below her knee, so she has some growing room, but it's not so longs as to get in her way while playing.


 The back.  You can see that it's a touch too big around, but not by much.  I made a small mistake with my serger which made it a tiny bit tighter around on one side, but luckily I had a little room to work with.  I sewed the buttons on a touch high, but I probably won't bother to move them.


 Cheesy pose, but it shows off the fit under the arms.  I was afraid the straps were going to be too short, but they were just right (I did not adjust them at all from the pattern).

Overall, A+.  I love the style on her and it's easy to make minor variations to the dress to change things up.  The pattern goes up to a size 10, so hopefully I can make some more of these before she's completely out of her dress phase.


Friday, April 10, 2015

Purdue Sweatsuit

I finally finished the Purdue sweatsuit I started for Dorothy months ago.  I have had the pants done for a long while.  I finally got around to doing the jacket and the thread didn't tie off correctly, so I had to hand stitch part of the drum, and it took me a while to build up the courage to try it.  Once I just sat down and did it, it turned out lovely, and you can't even tell where the stitching pulled out and I mended it by hand.

 It's a little hard to see, but I embroidered a block P on the chest pocket of the jacket and on one pant leg.


 When I did the jacket, I accidentally switched the silver and the gold threads.  I meant to have the gold on the outside, to match the one I did on the pants, but I sort of like the silver being the main color.  It stands out nicely on the black background.


 On the pant leg. Yes, she is wearing Purdue rain boots.  It ha been storming very badly here, and they were perfect.   Never pass up an opportunity to be super matchy.


 I couldn't get zip up sweatshirts without hoods, so I purposely positioned the drum a bit low so it wouldn't be completely covered up.


Without the hood in the way, it's a bit low, but I like how it looks.  If I do the drum again on a black background, I think I'll use a darker grey for the carriage.  I went with the medium grey, which looks OK, but when it was wet, I liked the darker color.  Usually, it would be black, but that wouldn't look right on a black sweatshirt.

I have a short sleeve, heather grey shirt that I want to put the drum on too, so she could wear the set together.  For today, it was just over her leotard for gymnastics class.  Luckily, it's big enough that she should be able to still wear it next fall.